NodeJS is required for installing bower and it's used for pulling front end dependencies.
Vagrant
Vagrantfile is included for development and testing with compatible backends.
To get started with Vagrant, download and install Vagrant and VirtualBox for your platform with the links provided:
Make sure you have docker installed. http://docs.docker.com/installation/
Here is an example run command, it will pull the image from docker hub initially.
docker run --name realms-wiki -p 5000:5000 -d realms/realms-wiki
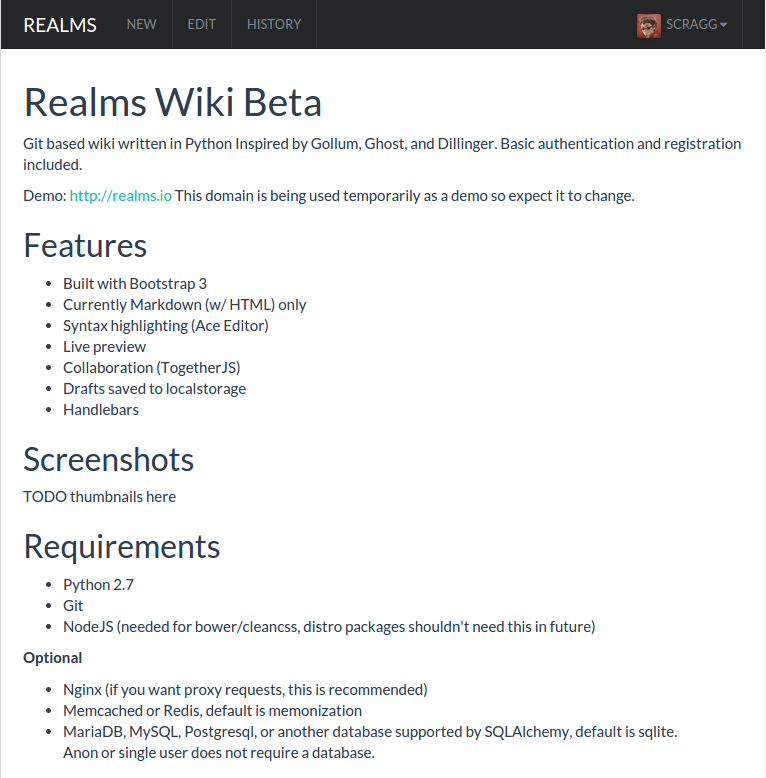
You should be able to run the wiki without configuration using the default config values.
You may want to customize your app and the easiest way is the setup command:
realms-wiki setup
This will ask you questions and create a realms-wiki.json file.
You can manually edit this file as well.
Any config value set in realms-wiki.json will override values set in realms/config/__init__.py.
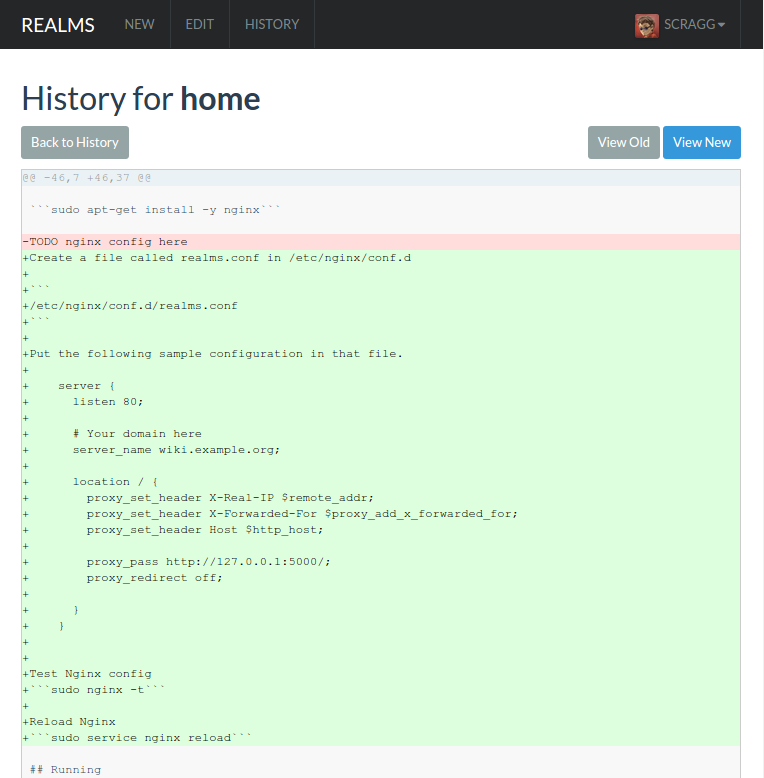
Nginx Setup
sudo apt-get install -y nginx
Create a file called realms.conf in /etc/nginx/conf.d
sudo nano /etc/nginx/conf.d/realms.conf
Put the following sample configuration in that file:
server {
  listen 80;

  # Your domain here
  server_name wiki.example.org;

  # Settings to by-pass for static files
  location ^~ /static/  {
    # Example:
    root /full/path/to/realms/;
  }

  location / {
    proxy_set_header X-Real-IP $remote_addr;
    proxy_set_header X-Forwarded-For $proxy_add_x_forwarded_for;
    proxy_set_header Host $http_host;

    proxy_pass http://127.0.0.1:5000/;
    proxy_redirect off;
  }
}
import os
import site

# Uncomment the following lines if you are using a virtual environment

# ----------------------------------
# Enter path to your virtualenv's site-packages directory
# VENV_SITE_DIR = ".venv/lib/python2.7/site-packages"
# PROJECT_ROOT = os.path.dirname(os.path.abspath(__file__))
# site.addsitedir(os.path.abspath(os.path.join(PROJECT_ROOT, VENV_SITE_DIR)))
# ----------------------------------

from realms import create_app
application = create_app()
Realms wiki comes with basic search capabilities, however this is not recommended
for large wikis or if you require more advanced search capabilities.
We currently support Elasticsearch and Whoosh as alternative backend.
WHOOSH_INDEX has to be a path readable and writeable by Realm's user. It will be created automatically if it doesn't exist.
Whoosh is set up to use language optimization, so set WHOOSH_LANGUAGE to the language used in your wiki. For available languages, check whoosh.lang.languages.
If your language is not supported, Realms will fall back to a simple text analyzer.
Authentication
Local
Local default will be done using a backend database as defined in the config.
To disable local authentication, put the following your config.
"AUTH_LOCAL_ENABLE": false
LDAP (beta)
Realms can authenticate users with a LDAP directory. It supports "direct bind" and "bind by search".
Use these examples as a guide and place it in your realms-wiki.json config.
An optional KEY_MAP can be used to map LDAP attributes to the Realms user object.
"Bind by search" example
In this example, BIND_DN and BIND_AUTH are used to bind to the LDAP directory (omit them for anonymous bind).
After binding, a LDAP SEARCH is performed using the template "USER_SEARCH". In this template, %(username)s is the
UserID that the user entered in the Realms authentication form. If the user is found in LDAP, a final BIND is tried
with his credentials to check the password.
Here authentication is just a simple BIND using the user's credentials. The user DN is given by the BIND_DN template.
In this template, %(username)s is the UserID that the user entered in the Realms authentication form.
(for brevity we don't repeat the Bind By Search configurations or the KEY_MAP, but they can be used with TLS too)
LDAP over TLS is typically done like this:
"LDAP": {
    "URI": "ldaps://127.0.0.1:686",
    "BIND_DN": "uid=%(username)s,ou=People,dc=realms,dc=io",
    "TLS_OPTIONS": {
        "CA_CERTS_FILE": "PATH TO THE CERTIFICATE PEM OF THE AUTHORITY THAT SIGNED THE LDAP SERVER CERTIFICATE"
    }
}
If the LDAP server certificate has been emitted by an authority that's trusted at system-level (and your Python version
is not too old), it might be possible to omit CA_CERTS_FILE.
If you don't want Realms to validate at all the LDAP server certificate (don't do that in production), pass an
additional VALIDATE option:
It is similar to LDAP/TLS. Just add a START_TLS option:
"LDAP": {
    "URI": "ldap://127.0.0.1:389",
    "BIND_DN": "uid=%(username)s,ou=People,dc=realms,dc=io",
    "CA_CERTS_FILE": "PATH TO THE CERTIFICATE PEM OF THE AUTHORITY THAT SIGNED THE LDAP SERVER CERTIFICATE",
    "TLS_OPTIONS": {
        "CA_CERTS_FILE": "PATH TO THE CERTIFICATE PEM OF THE AUTHORITY THAT SIGNED THE LDAP SERVER CERTIFICATE"
    }
    "START_TLS": true
}
The VALIDATE option can be used here too.
Configuration change for TLS
Please note that the TLS/START_TLS configuration changed from previous versions of Realms. The old way that was from
flask-ldap-login using LDAP options like OPT_X_TLS_REQUIRE_CERT does not work anymore.
OAuth (beta)
Realms currently supports Github, Twitter, Facebook and Google. Each provider requires a key and secret.
Put them in your realms-wiki.json config file. Use the example below.
"OAUTH": {
    "twitter": {
        "key": "",
        "secret": ""
    },
    "github": {
        "key": "",
        "secret": ""
    },
    "google": {
        "key": "",
        "secret": "",
        "domain": ""    # this is optional if you want to restrict to a GSuite domain
}
Authentication by reverse proxy
If you configured realms behind a reverse-proxy or a single-sign-on, it is possible to delegate authentication to
the proxy.
"AUTH_PROXY": true
Note: of course with that setup you must ensure that Realms is only accessible through the proxy.
By default, Realms will look for the user ID in REMOTE_USER HTTP header. You can specify another header name with:
"AUTH_PROXY_HEADER_NAME": "LOGGED_IN_USER"
Running
realms-wiki start
Upstart (Ubuntu 14.04)
Setup upstart with this command:
sudo realms-wiki setup_upstart
This command requires root priveleges because it creates an upstart script.
Also note that ports below 1024 require user root.
After your config is in place use the following commands:
This file must be created as user root. Also note that ports below 1024
require user root.
Globally replace /home/ubuntu/realms-wiki/ in the example above with your local
Realms-wiki install path.
Note that this example uses the HTTPS (SSL) support built in to gunicorn.
It references the self-signed certificate that gets created if you run
sudo apt-get install ssl-cert. The private key is only visible to the group
ssl-cert, so in this example gunicorn runs with group ssl-cert.
Finally, let systemd know about the new config file:
sudo systemctl daemon-reload
After your config is in place use the following commands:
sudo systemctl start realms-wiki.service
sudo systemctl stop realms-wiki.service
sudo systemctl restart realms-wiki.service

# Enable auto-start of this service on reboot:
sudo systemctl enable realms-wiki.service
Development mode
This will start the server in the foreground with auto reloaded enabled:
realms-wiki dev
Other commands
Usage: realms-wiki [OPTIONS] COMMAND [ARGS]...

Options:
  --help  Show this message and exit.

Commands:
  auth
  configure      Set config.json, expects JSON encoded string
  create_db      Creates DB tables
  dev            Run development server
  drop_db        Drops DB tables
  pip            Execute pip commands, useful for virtualenvs
  restart        Restart server
  run            Run production server (alias for start)
  setup          Start setup wizard
  setup_upstart  Start upstart conf creation wizard
  start          Run server daemon
  status         Get server status
  stop           Stop server
  test           Run tests
  version        Output version

 客服电话
客服电话
 APP下载
APP下载

 官方微信
官方微信


请发表评论