Made to be able to support many git repo's and users with Read/Write customizable permissions.
Install Git Server
To install the git server run:
npm install git-server
To run tests
git clone https://github.com/qrpike/NodeJS-Git-Server.git
cd ./NodeJS-Git-Server
make test
Example Usage
The GitServer is a very easy to get up and running git server. It uses the Pushover and git-emit modules for listening to git events, and its own layer to do the security for each repo & user.
These events are informational only. They can not be aborted.
post-applypatch
post-commit
post-checkout
post-merge
post-receive
post-update
post-rewrite
##abortable events
These events can be aborted or accepted. If there will be no listeners for any of these events, they will be automatically accepted. If object can be aborted, it will have canAbort property in update argument.
fetch
commit
applypatch-msg
pre-applypatch
pre-commit
prepare-commit-msg
commit-msg
pre-rebase
pre-receive
update
pre-auto-gc
varGitServer=require('git-server');varnewUser={username:'demo',password:'demo'}varnewRepo={name:'myrepo',anonRead:false,users: [{user:newUser,permissions:['R','W']}]}server=newGitServer({repos: [newRepo]});server.on('commit',function(update,repo){// do some logging or other stuffupdate.accept()//accept the update.});server.on('post-update',function(update,repo){//do some deploy stuff});
When we start the git server, it will default to port 7000. We can test this using git on this (or another ) machine.
git clone http://localhost:7000/myrepo.git
Since this repo does NOT allow anonymous reading, it will prompt us for a user/pass
To make this faster, we can use the basic auth structure:
update is an http duplex object (see below) with these extra properties:
{cwd: '/tmp/repos/stackdot.git',// Current repo dirrepo: 'stackdot.git',// Repo nameaccept: [Function],// Method to accept request (if aplicable)reject: [Function],// Method to reject request (if aplicable)exists: true,// Does the repo existname: 'fetch',// Event namecanAbort: true// If event can be abbortable}
HTTPS
The ability to use HTTPS is now implemented for the module and the cli. This is important so that your username & password is encrypted when being sent over the wire. If you are not using username/password then you may want to disregard this section.
To enable HTTPS in the module, use the 'cert' param:
Also, be aware that when using HTTPS for the git server, when you try to clone,etc. It will give you an SSL error because git (which uses CURL) cannot verify the SSL Cert. To correct this, install a actual, verified SSL Cert ( Free ones here: StartCom )
If you want to keep using the self signed cert like we created above ^ just tell git to not verify the cert. ( Other ways to do it here )
export GIT_SSL_NO_VERIFY=true
And you are good to go!
CLI Usage
When you install this package globally using
sudo npm install -g git-server
You will now have a CLI interface you can run and interact with.
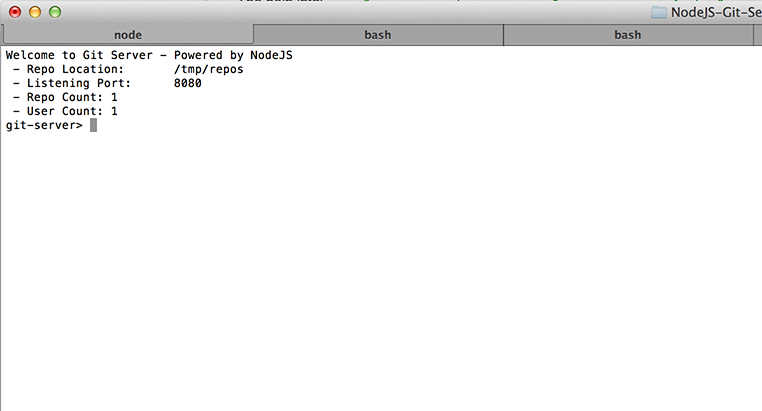
Get started by typing git-server or gitserver into your terminal.
You should see something similar to this:
With this interface you can type the following to see the available commands:
git-server> help
You will see a list of possible commands, just enter a command and the prompt will ask you for any additional details needed.
TODO Items
Make YouTube demo of the app
This is a work in progress - please feel free to contribute!
Permission is hereby granted, free of charge, to any person obtaining a copy of this software and associated documentation files (the "Software"), to deal in the Software without restriction, including without limitation the rights to use, copy, modify, merge, publish, distribute, sublicense, and/or sell copies of the Software, and to permit persons to whom the Software is furnished to do so, subject to the following conditions:
The above copyright notice and this permission notice shall be included in all copies or substantial portions of the Software.
THE SOFTWARE IS PROVIDED "AS IS", WITHOUT WARRANTY OF ANY KIND, EXPRESS OR IMPLIED, INCLUDING BUT NOT LIMITED TO THE WARRANTIES OF MERCHANTABILITY, FITNESS FOR A PARTICULAR PURPOSE AND NONINFRINGEMENT. IN NO EVENT SHALL THE AUTHORS OR COPYRIGHT HOLDERS BE LIABLE FOR ANY CLAIM, DAMAGES OR OTHER LIABILITY, WHETHER IN AN ACTION OF CONTRACT, TORT OR OTHERWISE, ARISING FROM, OUT OF OR IN CONNECTION WITH THE SOFTWARE OR THE USE OR OTHER DEALINGS IN THE SOFTWARE.

 客服电话
客服电话
 APP下载
APP下载

 官方微信
官方微信


请发表评论